
When the crops lay heavy and ready to harvest, it can only mean one thing: it’s time for the Hindman Settlement School’s annual canning class! Local master canner Bonita Adams and her daughter Liberty Campbell taught a class of Grow Appalachia participants water-bath, pressure, and cold canning techniques.

Grow Appalachia participants at the Hindman Settlement School canning class August 2018.
Water-Bath Canning
Water-bath canning, or boiling-water canning, can be used for high-acid foods like fruits and tomatoes (pH 4.6 or lower), but should not be used for low-acid foods like green beans. Participants water-bath canned salsa made from fresh tomatoes and a packaged mix (recipe below).
Canned Salsa
Makes 4 pints.
Ingredients
- 6 lbs fresh tomatoes
- ½ cup white vinegar
- 1 pouch salsa mix
Directions
- Wash tomatoes.
- Scald for three minutes in boiling water.
- Dip into cold water.
- Remove skins, cut out cores, and chop coarsely.
- Combine tomatoes, vinegar, and salsa mix in large non-reactive (not aluminum) saucepan. Bring mixture to boil. Stir occasionally. Reduce heat and simmer 10 minutes, stirring occasionally.
- Pour salsa into pint jars, leaving ½” headspace. Wipe rim, cap. Process for 40 minutes in water-bath canner.
Pressure Canning
Pressure canning must be used for low-acid foods (pH above 4.6) like green beans, corn, and meat. Low-acid foods can also be canned with this technique. Participants pressure canned green beans (recipe below).
Canned Green Beans
Makes 6 pints
Ingredients:
- 5 to 7.5 lbs beans
- water
- 3 tsp salt (optional)
Directions
- Rinse beans. Remove strings and break into 2” pieces.
- Heat jars in boiling water. Bring water in canner to boil, reduce heat to simmer.
- Pack beans tightly into hot jars, leaving 1” headspace. Add ½ tsp salt to jar, if desired. Ladle hot water over beans, leaving 1” headspace.
- Place cans in canner, then place lid on canner and lock it. Adjust heat to medium-high. Vent steam for 10 minutes.
- Put gauge on vent. Bring pressure to 10 psi. Process at 10 psi for 20 minutes.
- Turn off heat, cool to zero pressure. Remove lid after 5 minutes. Cool jars 10 minutes before handling. Cool 12 hours before checking seals and storing.
Cold Canning
Cold canning, also known as fresh-pack canning, preserves a fruit or vegetable without an airtight seal for several weeks. Participants learned how to cold can cucumbers to make dill pickles (recipe below).
Cold-canned Pickles
Makes 5 pints
Ingredients:
- 15 small- to medium-sized cucumbers
- 4 cups water
- 2 cups white vinegar
- 2 tbsp kosher salt
- 1 tsp sugar
- big bunch of dill
- 1 head of garlic, skins removed, cloves smashed
- 10 peppercorn kernels
- 5 pint jars
Directions
- Slice cucumbers into ¼” spears.
- Make brine. Combine water, vinegar, salt, and sugar in medium saucepan. Bring to boil, swirl to dissolve salt and sugar. Cool to room temperature.
- Add cucumbers to jars. Then add dill, garlic, and peppercorn. Add enough brine to cover cucumbers.
- Seal with airtight lid and place in refrigerator for one week. Good for 4-6 weeks.
Participants walked away with three jars of food, a Ball Blue Book Guide to Preserving, and the knowledge of how to put up their harvest.
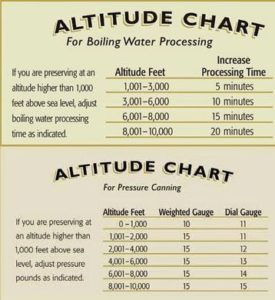
Tip of the month: When canning at an altitude above 1,000 feet, adjust processing time for water-bath canning or pressure for pressure canning using the chart below.
Leave A Comment