Greetings, Grow Appalachians! It’s your friendly HQ VISTA Holly checking in. I think I’m still not quite recovered from our gathering this past week. What an AMAZING day and a half it was! I am so glad that I got to meet so many of you and hear about all of the wonderful things you are doing in your respective parts of Appalachia- it’s so nice to finally be able to put a face to the name behind the emails and blog posts. Your enthusiasm and your stories are an inspiration, and I’m so excited that my VISTA term ends in September; therefore, I get to navigate the majority of this year with you all!
Moving forward on our quest for knowledge dissemination, I’m going to be covering a few tricks for promotion of healthy biological activity in the soil. It sounds like a mouthful, and this encompasses a lot of different concepts, so I’ll be sure to explain as clearly and simply as possible. First off, it’s important to remember that soil should never be kept bare. Not only is bare soil much more susceptible to erosion, it is also entirely exposed to the elements. One fundamental concept of minimizing bare soil, and one many of you are probably very familiar with, is mulching.
Mulch is a layer of material added to the top of the soil. In addition to its effectiveness of combating erosion, mulching also maintains soil moisture and temperature and slows weed growth, among many other benefits. In terms of actual material, there are many options available to you, many of which you can obtain right from your own backyard. Leaves and grass clippings are excellent options, as is straw, although straw can sometimes be a costly option. If you do purchase any commercial mulch with Grow Appalachia funds, be sure it’s organic 🙂
Another soil-friendly option is adopting a no-till (or minimum till) system. Now, before I continue, let me offer a brief disclaimer: Tilling is not bad. Let me repeat that: TILLING IS NOT BAD! But since we’re covering options that allow for optimal soil health, this topic bears addressing. I can see some of you now…

But what about our Grillo?
Going no-till can seem a bit daunting, but here’s a small bit of food for thought: Soil, in and of itself, is a very complex and intricate system. What lies underneath is a vast array of microorganisms and other nutrients, and when you till, you disturb the natural processes that are occurring. Going no-till has many of the same benefits as mulching; perhaps the most beneficial is that you save both time and energy, because once the area is properly established and set-up, there will be little to no input required from you. Mulching in a no-till system is absolutely essential- it is advised that mulch be applied thickly and in layers, so as to leave the underneath layers of soil as undisturbed as possible. Mother Earth news has a great article on the pros and cons of using a no-till system, and you can find it here; it is a bit outdated, but it contains some great information.
Now, let’s talk crops! Or, more specifically, crop diversity. I suppose this can go hand-in-hand with crop rotation, but, to put it simply, crop diversity is planting a variety of crops each year, so that the same crop is either never in the same place twice, or grown with other crops in its particular plot. If the same crop is planted in the same area on a consistent basis, it can deplete the soil’s nutrients and encourage pests, weeds, and disease. For example, tomato and corn are heavy nitrogen and phosphorus-leachers, so if you plant a crop of those in the same location year after year, pretty soon there won’t be enough of those nutrients left in the soil to allow for adequate nutrition to the plant. It’s also important to try to include legumes into your rotations, as legumes add nitrogen to the soil. Legumes would be your peas, beans, peanuts, etc. Finally, consider using cover crops, which are crops that are grown in order to “die back” into the garden; this is for the sake of being used as organic matter to build up the soil. This is why they’re sometimes referred to as “green manure”. Depending on what you grow, you want your cover crop to be compatible: For example, with solanaceous crops (your tomatoes, peppers, etc), plant a crop of cereal grains or grass, and then follow with legumes. Below is a simplified crop rotation diagram.
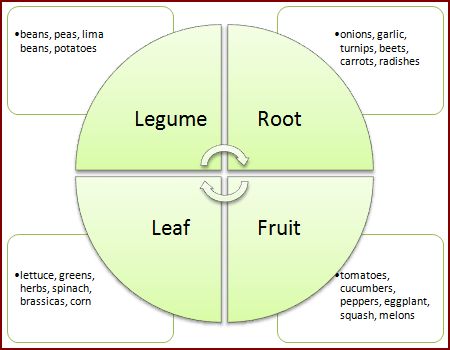
Photo c/o betterhensandgardens.com
One final comment: There are a lot of different options and techniques out there, so take some time to explore your options and see what works best for you and your individual situation. Lastly, BE PATIENT. Good, meaningful things take time. You aren’t going to have absolutely beautiful and fertile soil overnight. Reach out to your NRCS agents, your extension agents, or us at HQ if you get stuck. If you try something that works really, REALLY well for you, share it with the rest of the family!
Here’s to good soil health! Now to wait for the snow to melt…
Sources:
http://www.nrcs.usda.gov/wps/portal/nrcs/detail//?cid=nrcs143_023585
http://eartheasy.com/blog/2009/01/no-till-gardening/
http://www.organicgardening.com/learn-and-grow/crop-rotation
John Graham, NRCS soil specialist for Kentucky, on going no-till http://www.nrcs.usda.gov/wps/portal/nrcs/detail/ky/soils/health/?cid=stelprdb1096792
Leave A Comment