
Growing up, kraut (or sauerkraut as we called it) wasn’t something that I liked. My dad would order it on hot dogs at the beach and sometimes my mom would make it with boiled dinner but it wasn’t until I got my first Crock-pot that I found out I really like kraut—with barbecue sauce. But that’s a story for another time.
Today I want to share my adventures in making kraut. Last year (my first in Grow Appalachia) several of my families grew cabbage specifically to make kraut. They shared their recipes with me but never any of their kraut. I began to think that it must be a very difficult process since people who were very generous with their zucchini and cucumbers would not gift me with a jar of kraut. I started asking for recipes and techniques and it sounded really, really simple. So this year, I grew cabbage to make my own kraut.
Unfortunately the cabbage in the monastery garden didn’t form heads for some reason but there was enough in the demonstration garden at the Mission to use for my first venture into kraut-making. I cleaned and sterilized my jars and lids, got cutting boards, knives and choppers together, said a small prayer to St. Hildegard (not that she is the patron of kraut or anything but it couldn’t hurt) and commenced to making kraut.
It really is easy. First, chop your cabbage. Then put a teaspoon of canning salt in the bottom of each jar. Then add the cabbage and one tablespoon of white vinegar. Next fill the jar with warm water. Add another teaspoon of salt and seal the lids hand tight. My friend Emily Shepherd says, “my hand tight, not his” meaning her husband Roger.
Put the jars in a cool, dark place and wait. That’s the hard part and the one I am in now. When the kraut stops “working” you wipe down the jars, tighten the lids and store your kraut in the pantry—right next to the barbecue sauce.
It’s been four weeks since I made the kraut so it is getting close. I will let you know how it tastes and maybe even share my barbecue sauerkraut story with you.
DISCLAIMER: The recipe given here is regional, handed down woman to woman and has not been tested by the USDA. Please acquaint yourself with the process of fermentation of food and the use of the equipment before trying this recipe. There are several good Extension Service publications to choose from.
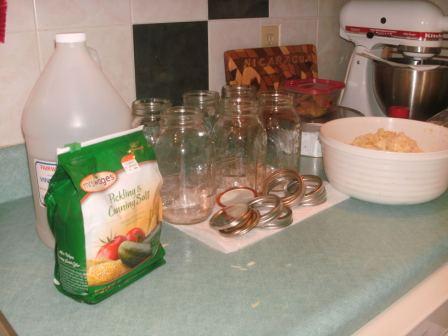
Assemble all your ingredients and equipment
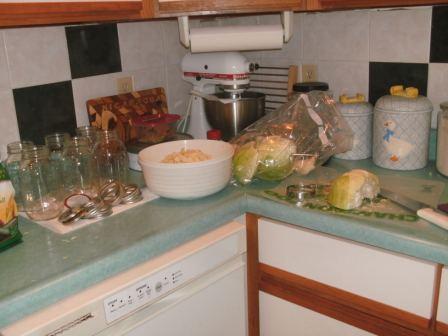
Chop the cabbage into small pieces. I found using a knife to slice the cabbage first and then chopping it with the slaw chopper worked best for me.

First went the teaspoon of salt, then the cabbage.
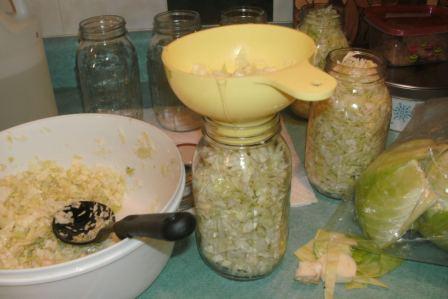
Follow that with a tablespoon of 50 grain white vinegar. Fill the jar with water (warm according to Emily) and another teaspoon of salt. Hand tighten the lids and put the jars in a cool place to “work”.
What was the Zodiac signs during your krautin’?
If it turns out slimy, wrong one. Got to be brickle kraut.
Yes, I’m an old Foxfire Book veteran. LOL
Hey Woodall. I made my kraut on July 19th which by my calendar said was the thighs. Is that a good one? I’d hate slimy food. That’s why I only do my okra battered and deep fired.
As long as the signs are not in the bowels-should be ok.
The new moon is the best time to make sour kraut.
Can’t wait to hear how this turns out. I am going to plant more cabbage next year and give it a try myself. There is so much buzz about fermented food these days, I want to try my hand at raising some microscopic livestock too! Thanks for the tutorial.
Hi Erica. My friend Todd Howard did fermented tomatoes last year. He had so many “not good for farmers’ market” tomatoes that he was canning alot and got tired of it. So he decided to give fermenting a try. The first batch he did the recipe for a ten gallon crock and then realized that his crock was five gallons. The tomatoes were great–for chili. lol you didn’t have to add any salt that’s for sure.
Sr KC,
Thanks for the kraut recipe. You make it seem quite simple and that I could do it too. We never made kraut in any of our sessions this year, but that will be a goal for next year. I’m pleased to say my daughter did make several jars and like you as an adult has developed a liking for kraut. On another cabbage note, have you tried baking cabbage? Just cut cabbage up and add polish sausage, peppers/onions if you like and bake. Note: I line the pan w/foil and wrap tightly. Has been a favorite here.